I'm so happy to announce that Susan's Small Animal Crochet - 2nd Edition - is now live on Amazon and on Etsy as an eBook!

There are 13 different animals: sparrow, winged songbird, hummingbird, squirrel, two fish and a goldfish edging, a snail, a sleeping cat, tiny penguin, owl, bumblebee, butterfly, ladybug, dove, bunnies, chameleon and little pony. There are also instructions for working a thread crochet Santa hat on the cat, owl and penguin.
Here's an excerpt for your enjoyment! (scroll down) If you enjoy it, I hope you'll consider supporting my art and design work by buying the full book for $7.99. Thank you in any case, for being a blog reader of mine!
❖
Bumblebee Pattern
Materials
Note about making a bee from primarily medium weight yarns: if you wish to use this pattern with traditional yarn for a larger bee (approximately 2 ½” long), use a size G hook and medium weight (no. 4) yarn. For the second round of the body of the bee, use that (presumably black) medium weight yarn together with a strand of yellow (either yellow yarn or yellow crochet thread). For the wings, you can use either a lightweight yarn (baby yarn) or medium weight yarn.
Larger Bee Materials:
Black yarn (medium weight)
Yellow yarn OR crochet thread (they give a different look, but either will work)
White yarn (preferably light weight baby yarn)
Size G aluminum hook
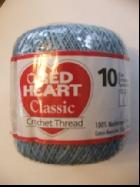
Note about making a bee from crochet thread or lightweight yarns: To make a smaller bee (perhaps 1 ½” long) you may use the same pattern with lighter weight materials. Use a double strand of No. 10 crochet thread OR a single strand of No. 3 crochet thread, (which is thicker) and a size 0 steel hook (3.25 mm). You could also use a fine weight yarn. When you get to round two of the bee body, you’ll be adding a strand of yellow crochet thread (preferably No. 10). For the wings, you’ll use a single strand of No. 10 white thread and a no. 6 steel thread crochet hook. Another tip: sometimes you can use craft floss or embroidery floss as an alternative to crochet thread, so pick up a pack of lots of color and have fun! Some work better than others, so you need to experiment.
Smaller Bee Materials:
Black crochet thread (No. 3 weight, preferably; you may also use a double strand of No. 10 weight) OR if you wish, light (baby) weight black yarn
Yellow crochet thread either No. 3 weight or No. 10 weight
White crochet thread OR light weight baby yarn
Size 0 (3.25 mm ) steel thread crochet hook
Instructions:
Bee body: both for a yarn bee and a thread crochet bee, work with two strands held together as one. For the yarn weight bee, this will be black medium weight yarn and a contrast color of embroidery floss or crochet thread (this will be yellow for a bee) For the thread crochet bee, you’ll use a double strand also: black thread and yellow thread.
Rnd 1: This will be a small circle. Ch 3, join to 3rd ch from hook to form a tiny ring, then work 2 ch, dc 11 times in ring to form a small disc. Join. A special note: if you are using crochet thread which typically has less spring to it, you may wish to make that beginning ch-3 ring into a 4-ch ring. It will be easier to make your long single crochet stitches in a slightly larger center when using the less flexible thread.
Rnd 2: work 11 to 14 long single crochet stitches over the dc’s from prev round; you’ll stop when you have covered ¾ (9 stitches) of the dc’s of the prev round. The actual number of lsc’s may vary because individuals vary in how they form their stitches, so just stop when you’ve circled three quarters of the way around the disc. If you’re not sure how to work a long single crochet, just remember that a long single crochet stitch is the same as a normal single crochet, except that you insert your hook in a different place. In the case of this circular bee body, you’ll be inserting your hook into the center of the circle of dc’s. Then you’ll yarn over, then adjust your tension so that the working thread isn’t too loose or tight, and finish your crochet stitch as if it were a normal single crochet. Here’s the video showing how.

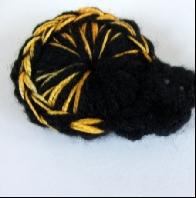
After you’ve worked lsc’s ¾ of the way around the disc,
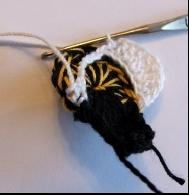
Cut the strand of the yellow crochet thread and continue to work 4 more lsc over the last 3 dc from rnd 1. This way you’ll have long single crochet stitches completely covering the stitches from round one, most of them with yellow
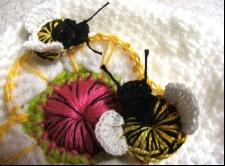
stripes, and the last 4 stitches worked only in black yarn. (See photo above) Join.Turn.
Rnd 3: (Head): Ch 2, work dc in next lsc, 2 dc in next lsc, then dc in one more lsc. Ch 2, join at the base of last dc worked (at the base of the head). Tie off and weave end through work. Also make sure to knot and weave the end of the yellow crochet cotton through the back side of your work.
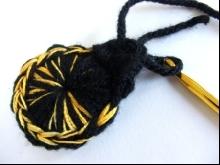
Antennae: Tie a 5” length of yarn (or thread) to one end of the head, with its two tails hanging free (see photo). Pull one of the tails of yarn through to the other side of the head, and knot both yarn ends securely. Trim both ends to ¾” or desired length for antennae. (Stiffen with fabric stiffener if desired when you’re finished with your bee!)

Wings: There are two versions of bee wings, shown in the photo above. Version One are wings that extend outward from the bee and don’t hide the bee’s body --see two bees on the right side of the photo. Wing version number Two are the wings which are stitches worked on a foundation of chains which travel across the back of the bee in a V shape; they extend upward vertically from the bee. (See the two bees on the left side of the photo to see this wing version.)
Change to white yarn or thread (see notes on materials).
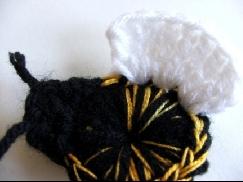
Wings, Version 1 (shown in photo above): (these wings extend outward from the bee and don’t hide the bee’s body, remember).
Attach yarn at the “four-o’clock” point on your bee, four stitches to the right of the base of the bee’s head. Ch 2, work (dc, tc) in same stitch, then work 3 tc in next 2 stitches; work (tc, dc) in last lsc then ch 2 and join at base of wing. Tie off and weave end through your work (I prefer to weave the end of the white yarn through the base of the tc’s where they meet the bee’s body.)
Attach yarn for second wing just to the left of the base of the left side of the bee’s head, work second wing as before, tie off and weave end through your work.

Wings, Version 2: (these wings extend upward from the bee and are formed on a length of chains which are worked in a V-shape across the back of the bee)
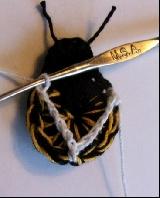
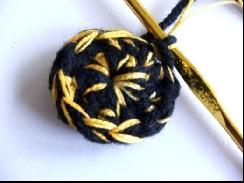
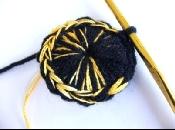
Attach white yarn to the “two-o’clock” position at the lower right edge of the bee’s head (see photo above). Ch 6 (or the right number of chains to reach the “6 o’clock” position on the bottom center of the bee). Join to bottom center point, ch 6, join to other shoulder at the base of the bee head. (See photo above left) Turn.
now form main shape of wing, version 2: ch 2, dc in next ch of ch-6 length, (dc,tc) in ch, 2 tc in ch, (tc,dc) in ch, dc in ch, ch 2, join to same ch, sl st to center point of bee’s back and join to center point (at the center chain from rnd 4). You should be at the bottom center of the bee’s body. Sl st to be in position for next wing and continue to form next wing: ch 2, dc in same st, (dc,tc) in ch, 2 tc in ch, (tc, dc) in ch, dc in ch, ch 2, join to same ch. Tie off and weave end of thread through your work.
❖
Thank you for reading my blog!
If you'd like to see more about my patterns, you can look at my Etsy store or my Amazon Kindle crochet patterns. A paperback of my Showy Flower Crochet Patterns has just been published, (see cover below)

Happy Crocheting!
No comments:
Post a Comment