Sunday, March 21, 2021

Free Hummingbird Pattern and ... my Giant Crochet Pattern Treasury now $9.99 (USD) on Amazon!

 Free Hummingbird Pattern and ... Check out my Giant Crochet Pattern Treasury now $9.99 (USD) on Amazon!

I'm back at the crochet drawing board and yearning for spring to come, too! Which of course makes me think of crochet flowers and birds! I now have two little granddaughters and I've been enjoying bequeathing little crochet bags and hats to them. Kids and crochet just go together! 

One of my favorite little patterns from my archives has been this little hummingbird, which really isn't too difficult if you have a basic familiarity with sc, dc, tc, ch and this long single crochet stitch (also known as the spike stitch)...(here's a video.explaining that last) ...scroll down for the pattern!

scroll down for pattern

Incidentally, this is my (Amazon) paperback collection of 14 of my small animal appliques all in one place...and here's the Kindle eBook Treasury of almost all of my small project designs including these animal appliques. (It's in the Kindle store on Amazon, and if you are a Kindle Unlimited member, it's free! This latest revision includes more than ten new patterns, including new baby hats, scarves and animal appliqués. There is a total of more than 70 individual patterns: scarves, baby hats, crochet jewelry, craft projects, lots of crocheted flowers, garlands, and more.  

Kindle eBook version of the Small Animal Applique pattern collection

Kindle eBook version of this hummingbird pattern

So here is the pattern for the little hummingbird applique below. Thanks for being a blog reader!

Hummingbird Ornament or Appliqué


This little ornament is mostly a single round of stitches of varying height, all worked counterclockwise on top of a length of foundation chains. As you form the bird’s head, you will notice that the beak is nothing more than a floppy length of chain stitches: don’t worry, when you pin this loop to a piece of cardboard and stiffen it with fabric stiffener or white glue, it will look like a hummer’s beak! This little guy is a bit tricky, but when you get used to it, he’s a snap to make. You can make the second round of decorative stitches in whatever colors you choose, making the wings and throat beautiful and unique. Have fun!

Notes:

Before beginning this piece, tighten your first chain into a  knot to secure end of bird (so it doesn’t ravel).

Also see the diagram below which illustrates the first part of this ornament.

Starting at the arrow at the far left of diagram, Ch 14. This is the foundation chain.


Rnd 1: ch 3 (counts as first dc), dc in 4th ch from hook, ch 12 (this will be the beak) join securely to top of dc just worked so end of beak is tight, work counterclockwise around top of head as follows: 5 dc in same ch, dc in next 6 foundation chs, hdc in next ch, sc in next 5 chs, hdc in last ch (you should be back at your beginning knot). Ch across to opposite side of tail, ch 2(counts as hdc on belly side of bird), sc in next 5 foundation chains opposite 5 sc on other side, hdc in next ch, dc in next 5 ch, join to 2nd ch of beginning ch-3 of rnd 1. You should have a wingless bird. Do not tie off, but continue as follows:

See the next diagram which shows you round two:


Rnd 2: covering the bird in long single crochets and forming the wings: (see diagram above)

Pass thread behind beak and at point A, begin lsc stitches discussed on page 1 and in this video.

From point A, work lsc stitches, inserting hook at a point in the center of the bird’s head. Work counterclockwise, and when you reach point B, start on main wing

(this is the wing on the left. After it is worked, you will sl st across to point B again and work the second wing on the right, then you will tie off.)

To make main wing,(the one on the left)  ch 11, then rotate counterclockwise, and, skipping 1st ch on hook, work 2 sc then  8dc in next 10 ch stitches of wing. Sl st across , still working counterclockwise under the bird’s wing back to point B and work second wing on top of first wing: sl st to first ch, work 2 sc, 4dc in next 6 stitches, then ch 2, tc in next stitch. This is the tip of the smaller wing. Tie off.


Finish the rest of rnd 2: Attach thread at point C and work lsc as in diagram down the bird’s back. Insert your hook in various points, according to your judgment and design needs. When you reach bird’s tail, ch stitch across base of bird to other side of tail, and continue around with lsc stitches, working counterclockwise toward the beak. Tie off when you reach beak.


You will need to stiffen the beak with fabric stiffener, or, in a pinch, white glue. (before this, it will be a floppy loop!). After dabbing a small amount on the beak, pin the beak and the back of the bird’s head to a piece of cardboard and dab away excess stiffener.


Thanks for looking! If you'd like to see more, you can find all of my Amazon ebooks on crochet here; and on Etsy, my patterns can be found at susanlinnstudio.etsy.com

Have fun and happy crocheting!

Susan


Thursday, January 23, 2020

Scrap Crochet Afghan from Susan Linn Studio, free instructions

A Scrap Sampler Afghan is almost like freeform crochet; it is made using any stitches you like, with a new color for every row. I like to put contrasting colors next to each other every now and then. 


I wanted to show you guys how inspiring and fun it is to put together a scrap sampler afghan with the bits of yarn you have left over from other projects. I love this one, and I think I'll add a border! I'll have to update this blog post when I do. 

I love, in particular, the way that the earth tones look with the turquoise and teal colors. Most of all I love how little bits of black and white (cream, really) really really make it pop!

Here are the instructions;  if you enjoy them, please look at my reasonably priced small project patterns on Etsy and Amazon. Thanks you guys!

SCRAP AFGHAN INSTRUCTIONS:

Step 1: Start with a foundation chain in the desired length of the longest side of your planned afghan. In my case, I made a foundation chain approximately 60". Personally, I liked using a yarn for this which has a bit more stretch so that it wouldn't "pinch" my later work.

Step 2:  Work your desired number of rows in various colors, tying off and changing your color after each row. My first row was a dc row in teal. It is very important to lay your afghan on a flat surface and check that your width is not increasing or decreasing: it's very easy to inadvertently create a sloping edge even when you are careful with your stitch count. The weight of the afghan and how that affects your crochet work can still cause shrinking edges. My suggestion is to keep track of your width and adapt by increasing your stitch count evenly as needed.  

My favorite stitches you can use in your rows:

   Shell stitch with (or without)  surface crochet - see photo below: ch 3 for first dc, skip next st, 5 dc in next st, skip next st, sc in next st, continue to end of row, ending mid-shell if necessary. 
   Consider working surface crochet through the curving stops of your shells so as to obtain a nice contrasting thin line of color (see black shells with surface crochet in cream in the example below)


   Here is a helpful youtube video about working surface crochet: https://www.youtube.com/watch?v=GN8WIB9hYJQ

   When you end a row which has curvy shapes like shell stitches, make sure to even out your edge in the following row. When I am "evening out" after rows of shell stitch, I work sc in every stitch, switching to dc when I come to a sc in the prev row. 


   V Stitch: (see photo below)  work a row as follows: ch 3 for first dc, skip next st, *work 2 dc tog in next st, ch 1, work 2 dc tog in same st, skip next 2 st, repeat from * across, ending abruptly in the middle of a "V" if necessary.

If you work more rows of V stich on top of this one (remember to change color!), Ch3  for your first dc, then work your Vs across in the spaces between Vs on the previous row.


Below: Here's how two rows of V-stitch look on top of each other:


   Granny Stitch: (see below) A nice choice for a few rows is this familiar stitch, which goes quickly and is easy to work.  Ch 3 for your first dc, then skip 1 st, *work 2 dc in next st, ch 1, skip next st, repeat from * across. If you work successive rows on top of each other, simply ch3 for first st, work 2 dc in between every cluster of 2 dc in the previous row.


   Rows of DC or SC: (see photo below)
I guess it's obvious that you can simply choose colors and work dc across; break it up by working smaller lines of color in sc across as well. In the photo you may notice that the single crochets in the center of the photo are worked in back loops only (to get a different effect). 


   Row of DC followed by a row (in a contrasting color) of sc with regular intervals of spike stitch sc: see below


   Sometimes you may wish to make a couple of rows which look like they have little vertical stripes by working a row of dc first (see the white dc in the photo above). Then, in the next row, switch to a contrasting color and work sc across, making spike stitch sc at regular intervals. In my case I chose black and worked sc, sc, spike sc across and loved the way that it almost looked like black and white boxes or dots. To work a spike stitch, you simply insert your hook for that particular sc into the row below the working row, so that when you pull up and yarn over, the yarn stretches across for a long "footprint". Sometimes I call this a "long single crochet". You can see a video here: https://www.youtube.com/watch?v=4gNcV7MBojA

Step 3: Tie off and weave any loose ends through your work. If you wish, you can create a dc border around the edges of your work. 

Thanks for looking and check out my other blog posts, like this one with a free pattern for chunky crocheted bowls: 

 You can see all of my crochet eBook patterns here:

My Etsy pattern store 

My amazon store with pattern eBooks

Thanks for looking and happy crocheting!

Susan

Monday, August 14, 2017

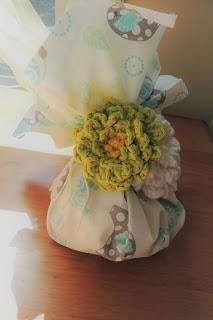
Crochet Flower and Fabric Scrap for a Gift Bag

I'm a crochet diva and sometimes even I forget that a  crocheted flower  makes a perfect bow! And wait...a scrap of fabric can simply be gathered up into a pouch and used - instead of a gift bag!


Put a flower on a pouch of fabric: instant gift bag!

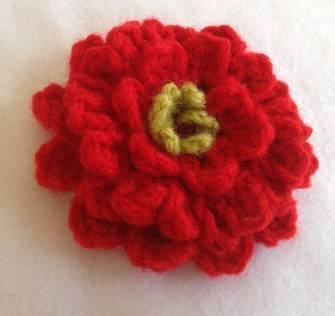
This is my Outside-In Zinnia pictured above, part of "Susan's Showy Flowers" crochet pattern collection.


Now don't get me wrong, I love gift bags because they are reusable. I think there might be some in our house which are as old as my youngest child and as wrinkled as her mom! They are fun, they are bright, they're nice and sturdy and HECK, they're so easy! Drop the awkward gift shape in them and you're done!


But if you happen to be a wanna-be hippie like me and would like to begin using up bits of yarn and fabric rather than run to the store, just cut out a piece of fabric large enough to enfold your gift, make a flower in 10 or 20 minutes (one of my newest flower pattern sets is linked below), and tie the flower onto the "neck" of your pouch with a piece of string.


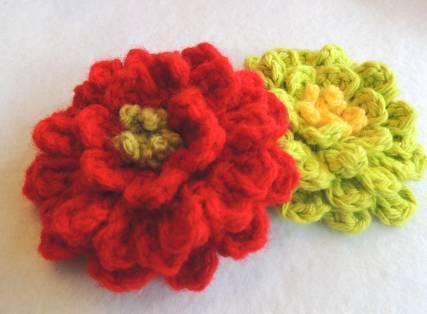
Here is the pattern for the Zinnia crochet flower above. (It's an excerpt from the crochet pattern book I mention at the bottom of the post)


Susan's "From-the-Outside-In" One Piece Zinnia

C:\Users\Susan\AppData\Local\Microsoft\Windows\INetCache\Content.Word\DSCN1199.jpg


The examples above are worked in a medium weight yarn for the main color, a lightweight yarn for the last few stitches of the flower center. Use a size G hook – for the medium weight yarn - and D hook – for the lightweight yarn.


flowerdividerNoBackgrsm.JPG


The nice thing about this zinnia (it ends up about 3" wide when worked in medium weight yarn) is that it's worked all in one piece, except for the center stamens if you decide to change color for them. It's super dense, the petals are beautiful and crowded, and it will stand up well to tough use on a child's hat or a basket or purse.

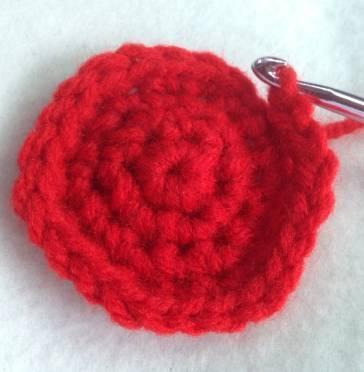
First, create a flat sc circle for your flower base: work in Front Loops Only!

Rnd 1 of base: Ch 2, work 6 sc in 2nd ch from hook. Continue working in the round in the same direction, no joining:


Rnd 2 of base: work 2 sc in FLO of every sc around, do not join: 12 sc circle


Rnd 3 of base: in FLO work (sc, 2 sc) around, do not join: 18 sc circle


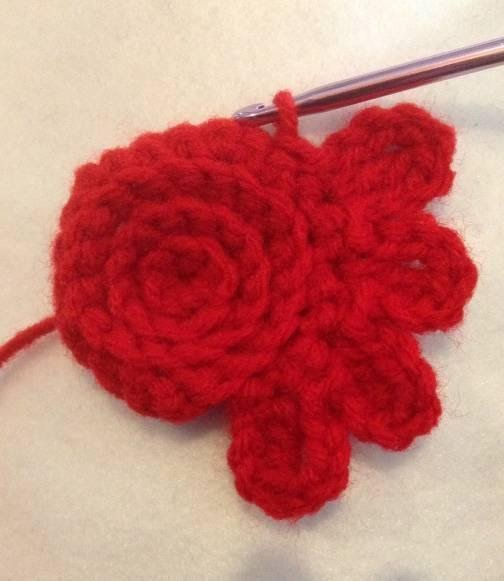
Rnd 4 of base: in FLO work (sc, sc, 2 sc) around. (See photos below) Sl st in next st, and flip to reverse side of work

C:\Users\Susan\Pictures\CrochetPhotos\NewFlowers\IMG_4329.JPG

After Rnd 4


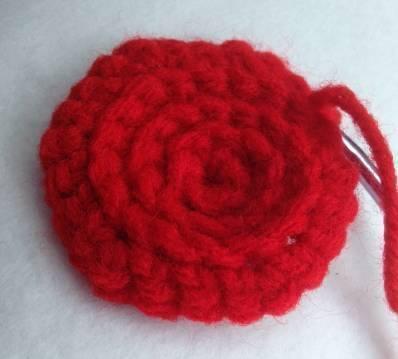
C:\Users\Susan\Pictures\CrochetPhotos\NewFlowers\IMG_4331.JPG

Flip to reverse side of work and notice the spiral of left-over loops into which you will work your next stitches.


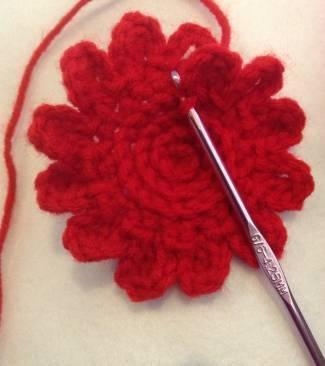
First outer petal round is a round of tc petals in every other stitch: Ch 3, tc in 1st (outermost) sc of circle, ch 3, sl st in same sc, *skip next sc, sl st in next sc, (ch 3, tc, ch 3, sl st in same sc), repeat from * around the outermost sc's of the circle. (See photo below).


At the end of the round, you should have 12 petals. Do not turn (do not flip), or join,

but continue on in the same direction:


As you reach the point where the sc's spiral inward, insert your hook in the remaining back loop of the next sc of the base circle (see photo on next page)

C:\Users\Susan\Pictures\CrochetPhotos\NewFlowers\IMG_4340.JPG


Now you have finished the outer petals and will start spiraling inward, continuing to work in the round.

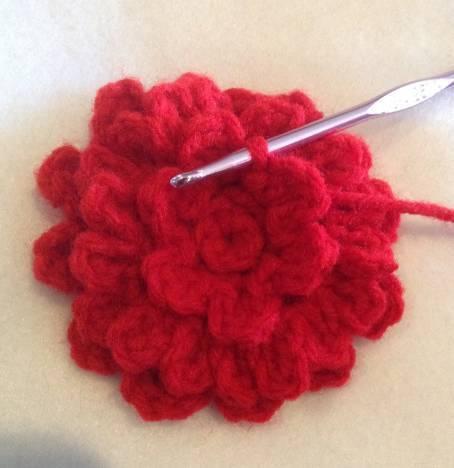
Work a round of dc petals in every loop: sl st, ch 2, dc in same loop, ch 2, sl st in same loop, *sl st in next loop, (ch 2, dc, ch 2, sl st in same loop), repeat from * for eighteen somewhat crowded dc petals. (This is one round around the center).

Next, a round of dc petals in every other loop: *skip next loop, sl st in next loop, (ch 2, dc, ch 2, sl st in same loop), repeat from * for six petals (one round). This should leave you 6 loops, close to the center.


In these rounds it is helpful to fold down the base disc so you can more easily work in these loops from the first rnd of the flower.

C:\Users\Susan\Pictures\CrochetPhotos\NewFlowers\IMG_4343.JPG


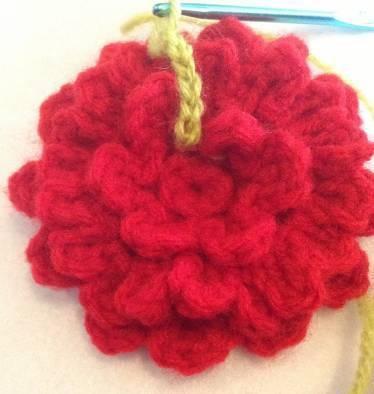
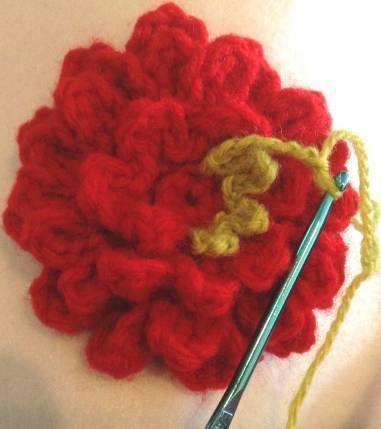
You will stop when you reach the last 6 loops of the inward spiral, change color to a lightweight white or pale green or yellow, (dmc embroidery floss is great for flower centers: I have used # 165). Also switch to a smaller D hook) and work as follows:


C:\Users\Susan\Pictures\CrochetPhotos\NewFlowers\IMG_4344.JPG


*(sl st, ch 7, sl st) in next loop, repeat from * 5 times, tie off.


C:\Users\Susan\Pictures\CrochetPhotos\NewFlowers\IMG_4346.JPG


Pull all,yarn or thread ends through to back of flower and weave through work.


C:\Users\Susan\Pictures\CrochetPhotos\NewFlowers\IMG_4353.JPG


flowerdividerNoBackgrsm.JPG


 If you're interested, my Amazon Kindle eBook "Susan's Shower Flowers"  of my best crochet flower patterns - including this one -  is live now and also Susan's Showy Flowers is on Etsy as an eBook in pdf form. ALSO, I'm so excited that it's available now as a 117-page 8"x10" full color paperback on Amazon as well. By the way, thank you for considering support of my design work by buying this crochet pattern book.😍


You can see all of my crochet eBook patterns here:

www.susanlinnstudio.etsy.com


https://www.amazon.com/Susan-Kennedy/e/B00O07W7MS/ref=ntt_dp_epwbk_0


Thanks for looking and happy crocheting!


Susan


Friday, January 6, 2017

Free Baby Hat Crochet Pattern excerpted from Susan's Flowers Bees Butterflies and More!

Hey you guys, I thought I'd post the free little single crochet baby hat pattern that I have as a little add-on on this Spring Flowers, Bees, Butterflies and More Crochet Pattern ebook.
Susan's pattern set includes step-by-step photos and detailed instructions for darling flowers, buzzy bees and this single crochet baby hat
my sassy flowers, bees and butterflies perch nicely on this darling sc baby hat

I'd love for you to check out the entire pattern set on shopify, amazon, or etsy, but in the meantime get started on that little baby's fuzzy little hat!


Abbreviations and Terms used in this Pattern: 


 Beg   beginning (as in, “sc in beg chain” – single crochet in the chain at the beginning of this portion).
Ch   chain
Dc   double crochet
Lsc  long single crochet, in which the hook is inserted below the normal space, to a previous round, resulting in a very long post which covers previous single crochets or double crochets (depending on the situation). 
Picot   small decorative bump made by making a chain, then going back to a loop a few chains back (the pattern determines how many), inserting your hook, yarning over and pulling through a sl st to join and form the bump
Prev    previous
Rnd    round  
Sep     separated
Sl st    slip stitch (running your thread through some work to get to a new place without changing the shape of the work; or, attaching to a stitch with just a loop pulled through) Sp    space formed in your work, usually on a previous round
St    stitch

 Instructions for Hat

Newborn (for an approximate head circumference of 12” when worked in baby or lightweight yarn) 
Begin with a ring made of ch-2 (in other words, ch 2, join to 2nd ch from hook to form a small ring);  rnd 1 is 6 sc in that ring;  rnd 2 is 2 sc in every sc(an increase in every stitch);  rnd 3 is working a sc in every sc, with 2 sc (an inc) in every other sc;  rnd 4 is working a sc in every sc, inc in every third sc;  rnd 5 is sc in every sc, inc in every 4th sc;  rnd 6 is sc in every sc, inc in every 5th sc;  rnd 7 - 16 is sc in every sc;  rnd 17 is again 1 stitch in every stitch, --but make every other stitch a long single crochet, which will make a long decorative post. In other words, *(sc, lsc) around. rnd 18 is sc in every sc, with a decr at the beg of the rnd. rnd 19 is a repeat of rnd 17, *(sc, lsc) around.  rnd 20-24 is sc in every sc, with a decr at the beg of each rnd.  

Then work a decorative brim which looks a bit frilly, if you wish:

Rnd 25: ch 2, dc in every dc around, join.

Rnd 26: *(ch 3, sc in next dc)around, join. Tie off and weave ends through work.


Tie off and weave ends through work.


3 Month: (for an approximate head circumference of 14” when worked in baby or

lightweight yarn) Use 4 colors, three solids and a variegated, if desired. 

Begin with a ring made of ch-2 (in other words, ch 2, join to 2nd ch from hook to form a small ring);

 rnd 1 is 6 sc in that ring; 

rnd 2 is 2 sc in every sc(an increase in every stitch); 

rnd 3 is working a sc in every sc, with 2 sc (an inc) in every other sc;  rnd 4 is working a sc in every sc, inc in every third sc;  rnd 5 is sc in every sc, inc in every 4th sc;  rnd 6 is sc in every sc, inc in every 5th sc;  rnd 7 is sc in every sc, inc in every 6th sc;

rnd 8 is sc in every sc, inc in every 7th sc; rnd 9 - 21 is sc in every sc; rnd 22 is again 1 stitch in every stitch, --but make every other stitch a long single crochet, which will make a long decorative post. In other words, *(sc, lsc) around.

rnd 23 is sc in every sc, with a decr at the beg of the rnd; rnd 24 is a repeat of rnd 17, *(sc, lsc) around. rnd 25-28 is sc in every sc, with a decr at the beg of each rnd.  

Then work a decorative brim which looks a bit frilly, if you wish:

Rnd 29: ch 2, dc in every dc around, join.

Rnd 30: *(ch 3, sc in next dc)around, join. Tie off and weave ends through work.


Tie off and weave ends through work.


6 Month: (for an approximate head circumference of 16” when worked in baby or

lightweight yarn) Use 4 colors, three solids and a variegated, if desired. 

Begin with a ring made of ch-2(in other words, ch 2, join to 2nd ch from hook to form a small ring);  rnd 1 is 6 sc in that ring;  rnd 2 is 2 sc in every sc(an increase in every stitch);  rnd 3 is working a sc in every sc, with 2 sc (an inc) in every other sc;  rnd 4 is working a sc in every sc, inc in every third sc;  rnd 5 is sc in every sc, inc in every 4th sc;  rnd 6 is sc in every sc, inc in every 5th sc;  rnd 7 is sc in every sc, inc in every 6th sc; rnd 8 is sc in every sc, inc in every 7th sc; rnd 9 - 11 is sc in every sc, inc in every 7th sc;  rnd 12-26 is sc in every sc; rnd 27  is again 1 stitch in every stitch, --but make every other stitch a long single crochet, which will make a long decorative post. In other words, *(sc, lsc) around.

rnd 28 is sc in every sc; rnd 29 is a repeat of rnd 17, *(sc, lsc) around.

rnd 30--34 is sc in every sc, with a decr at the beg of each rnd.  

Then work a decorative brim which looks a bit frilly, if you wish:

Rnd 35: ch 2, dc in every dc around, join.

Rnd 36: *(ch 3, sc in next dc)around, join. Tie off and weave ends through work.


Tie off and weave ends through work. 
Thanks for checking out my blog!! Please go to my etsy store, my shopify store, or my amazon listings to see what else I've got to keep you busy with easy little crochet projects!


Saturday, June 27, 2015

Glass Beads and Chain Stitch, awesome jewelry project for summer!!

I love making crocheted jewelry, and this redone pattern set has some new designs which are great for summer!

To make this Beaded Chain Stitch Summer Necklace...

You’ll need no. 10 crochet cotton and a size 7 steel thread crochet hook for this project, as well as the desired number of beads. I used about 220 variously sized glass beads, which when pre-strung on my thread (the first step you will read about below) stretched out to about 20”.

First, you’ll need to stiffen the neatly trimmed end of your working thread (the number 10 crochet cotton) so that you can string beads easily! Use a dab of white glue or nail polish,and while it’s not quite dry, roll it in your fingers to straighten it and make a sharp point!

Next, you will string all of your beads, in the exact order and layout that you want them, on to your crochet thread (see below).

Now comes the chaining part: start with a few chains using the end of the thread that was stiffened (you can trim that off). Then, pull up your first bead,

snug it against the chains you just worked, reach around it, (see below)

and continue on to chain 4. Sometimes you’ll need to seesaw your thread back and forth to make the area where you jump across the bead nice and tight.
Continue in this manner *chain 4, jump over bead, repeat from * to desired length (for me, that was eight feet!)

Your necklace grows as those stringed beads wait for you near your ball of thread. You’ll occasionally need to move them down, away from your work, as you need more working thread.

When you are done, knot the two ends together tightly with a double knot, then finish off the knot with a tiny dab of glue.

Your finished piece can be looped around itself three or even four times to make a beautiful piece of jewelry; you can even wrap it around your wrist many more times to make a gorgeous bracelet! The best part is, your necklace is washable and durable.
If you wish, you can work larger knots at each end of your necklace and put crimps and lobster claw closures on them to make the wearing easier. 

If you'd like to see the full pattern set , including lots of photos, 9 jewelry projects, and  a video explaining this necklace, you can check out the pattern for sale on Etsy,. If you'd like to see it on Amazon, go to my Amazon page. 

Hope you enjoy this simple little project and thanks for reading, you guys! 

Friday, May 29, 2015


Today I'm working on tapestry crochet! I love it, for some reason it never occurred to me to change colors so easily. You just start out with two or more yarns, and the ones which are not part of the design at the moment are just being carried along and are worked on top of. You can see in the photo above: that blue variegated yarn is just cruising along, hidden...UNTIL it's needed! Then you insert your hook, pick up the blue, and finish the sc with it. There's a lot more to it than that, if you want you can find any number of youtube videos on tapestry crochet.

I find it exciting to be able to create a repeating design with graph paper, the way knitters and crocheters have done for ages -- but to do so without annoying color changes! The catch is that three or more colors can get a bit bulky.

It's a switch from my usual applique and flower designs. My latest in that vein is a chameleon inspired by Pascal (in "Tangled"). You can find him in the store links below, so if you're so inclined, check out my latest at My Etsy Pattern Store or at My Ravelry Pattern Store
My 4-Chapter Mini Treasury

is also on Etsy right now for $12.99. It's one of my many small, low-commitment project collections!
Thanks for looking and keep that hook in your hand, it'll keep you out of trouble!
Susan Kennedy
www.susankennedy.com
www.susanlinnstudio.etsy.com
Also check out my patterns on Amazon!!

Saturday, May 16, 2015

Remember a crocheted pigtail? Free pattern for this curly crochet stitch

Here's a little crochet smile...I know lots of crocheters from the 70's will remember the crocheted pigtail stitch, and most people will probably still see lots of it at craft fairs: it's a staple of bookmarks and hair ties! So here's the very simple way to do it!

And at the end, I'll show you a picture of a slightly more involved fashion crochet scarf I designed which elaborates on the humble crochet pigtail and makes it into statement neckwear!

First you start with a length of chains, for practice just make 25. (below)


Then, assuming you want a straight expanse of stitches before the curls, turn, skip one loop and start sc (single crochet) back toward the beginning. For this example I single crocheted 10 times, (photo below) then I was ready to start the curls!


(below) Now here's the big secret: simply start working 2 sc in every chain! First you'll see a hump. 


Then as you continue 2 sc in every ch, you'll see your work beginning to curl back on itself. (below)


Just keep working and if needed, twist the curly part behind you in a clockwise manner so that the curl lies evenly. (Below)


(Below) Voila! A curly pigtail, perfect for the end of a bookmark, the ends of a hair tie, a bow for a gift....OR (read on)


You can invent a cool fashion statement from this curly stitch by varying it a bit. If you'd like to see my "Curly Vines" statement scarf pattern, click here.

It looks like this: 
I'm so proud of it!! I love any statement scarves that reflect humble natural forms, and this one reminds me of the tendrils of a vine or seaweed. So much fun!! Stand by for some scarf patterns which look like leaves, coral and lichens!! 

Thanks for checking out my patterns! To see more, you can visit my Etsy store, check out my crochet blog or facebook page to find free tips, small patterns and inspiration, or see my Amazon Author Central page to see my patterns on the Kindle ebook store. Have a great time with your crochet!